We’ve covered the factors involved in choosing between an aerial or buried fiber deployment, as well as the different types of installation methods. This post looks at the deployment itself – what are the options and what is best practice for a successful install?
Essentially, deployment can be either through the stationary or moving reel placing method – but before deciding on which is best for the particular project, follow this checklist:
Carry out a full route survey, and make sure that representatives of each organisation potentially affected by the installation are present.
Ensure that the right-of-way is free of obstacles, like guy wires and trees.
Gain permission from any property owners and relevant authorities if you need to set up any equipment on private land.
Make sure you have a properly trained and certified crew. They’ll need to be competent when working at heights, and have the right permits if working near power cables. Also, aim to employ experienced linemen that understand the aerial environment and its particular challenges.
Make sure all of the necessary environmental checks and provisions are addressed, including accounting for wind and ice loads, galloping and vibration.
Once you’ve completed the survey and gained all necessary permissions, you will need to decide whether you want to install the cable using stationary or moving reels.
Stationary Reel Placing Method
This method is generally used when cable is installed above existing lateral cable and other obstructions. The choice may also depend on the types of vehicles and placing equipment that are available to the installer. The method is as follows:
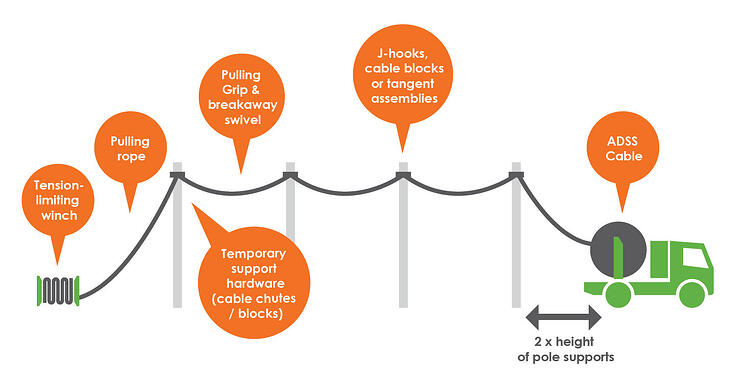
1. First, a series of temporary cable supports, chutes or tangent blocks are installed at each pole along the route.
2. Next, a pull line is threaded through the cable supports and attached to the outside of the cable using a breakaway swivel and a cable pulling grip.
3. The pull line is then used to pull the cable through the cable blocks into position.
4. If the cable is pulled with a winch, the pulling rope or winch line must be installed through the cable supports. A non-metallic rope or winch line should then be used to pull the cable.
5. It is vital that the pulling winch be calibrated to stop the operation when the installation tension exceeds the maximum rated cable load (MRCL). If this type of winch isn’t available, a dynamometer with an audible alarm or visual display should be used to monitor installation tension.
6. After the cable has been pulled into its final position, with slack for building access or for splicing, the cable should be tensioned until the correct sag level is reached.
7. It should then be terminated at each dead-end pole along the route.
Moving Reel Placing Method
The moving reel method can be used in situations where a cable reel trailer or aerial lift truck can be moved along the pole line and there are no obstructions to prevent raising the cable. The moving reel method is a one-pass operation and does not require the use of cable blocks or pull lines, so is generally quicker - although often not possible for the entire cable deployment, and will invariably require some stationary reel placing. Deployment follows this sequence:

1. The cable reel should be mounted on a reel carrier on a cable trailer or aerial line truck.
2. The reel carrier should then be driven along the cable route.
3. As it advances along the route, the cable ought to be paid off the reel with no back tension on the reel, guided to the pole, and supported with appropriate hardware.
4. When using the moving reel method, operators must ensure that the aerial line truck or cable truck is a suitable distance ahead of the first pole position. This ensures that there is sufficient slack cable available for splicing and slack storage.
5. During the operation, the installer should fit the appropriate dead-end support to the cable, raise it to the correct support level and mount the dead-end to the pole.
6. The placing vehicle must then be driven parallel to, and as close to, the pole line as possible, while maintaining constant speed and tension.
7. Once the cable pay-off is an adequate distance past the next pole in the route, the cable should be raised to the required pole height and placed into a J hook or temporary support.
8. The cable installation should then continue span by span until the entire run is completed and the final dead-end pole has been reached.
9. At this point the cable should be tensioned to the correct sag level using suitable chain hoist equipment at the "free" end of the cable, before it is dead-ended to the pole.
10. Once this has been done, the cable can be lifted out of the temporary J hooks or temporary supports and permanently fixed using tangent assemblies.
Choosing Dead-end Attachments
Perhaps the most widely used aerial hardware are dead-end attachments. Broadly speaking, there are two types - a formed wire design and the wedge anchor clamp type.
The formed wire dead-ends function by gripping the cable uniformly over the length of the support, typically two to four feet in length. For this reason, they are often seen as the strongest solution for long spans.
The alternative wedge clamp dead-end works by anchoring the cable between opposing wedge blocks, gripping a shorter distance of cable - perhaps only six to 12.
Other major factors in selecting the correct attachments include: inches. Wedge supports are perhaps better suited to scenarios where strain is less of an issue and spans and below 300ft.
What is the span distance between attachments?
Are there specific loading requirements - e.g. wind/ice?
What is the outer diameter of the cable being supported?
What size is the overall budget for pole attachments?
Is space prohibitive at the pole head?
Cable Termination Methods
Like every other fiber cable, aerial cable can be field spliced or deployed pre-terminated. Each method has its pros and cons. For the last drop especially, many network operators choose to use pre-terminated aerial cable because it eliminates the need for time-consuming and expensive fusion splicing. The main drawback to using pre-terminated cable is that there is almost always excess cable left over from installations.
Fusion splicing offers a high quality connection and little excess cable is left over once the process is complete. However, it is a time-consuming process and specialist equipment and experienced engineers are needed to carry it out. The whole process of preparing and splicing the fibers is made more difficult when the network access point is mounted at pole height.
03-21
202502-12
202509-12
202409-05
202408-16
202408-07
202408-06
202408-02
202407-30
202407-29
2024